<!-- Home, Back using Javascript -->
<div>
<form>
<input type="button" value="Home" onclick="window.location.href='/ep1000digfab/index.html'">
<input type="button" value="Back" onclick="history.back()">
</form>
</div>
<div style="height:2em"></div>
<!-- Remember to change the title of the page -->
## Creating Models using Fusion 360
[Presentation - CAD Creating Models](ep1000_cad.pdf)
Fusion 360 is AutoDesk's latest product into CAD. It takes the best features from AutoCAD and Inventor, adds CAM (Computer Aided Manufacturing), Sculpting and Electronics Design to the system. Best of all, the software is available to Students for a 3 year-lease period.
Here are some main topics that you need to master in Fusion 360:
* The user interface
* Saving and exporting designs
* 2D sketching
* Drawing constraints and how to apply them
* Extrusion
## Helpful Tutorials
### Kevin Kennedy: Product Design Online
Kevin Kennedy has a great site for beginning and learning Fusion 360. Most of the Youtube videos are fully instructional and beneficial to developing models.
Don't forget to check the accompanying pages on his [website](https://productdesignonline.com) for guides to each of the videos.
Recommended Tutorials:
- [Fusion 360 User Interface | 2021](https://youtu.be/WKb3mRkgTwg)
- PDF File [Checklist for Fusion 360 beginners](http://bit.ly/f360checklist)
- [Default settings for Fusion 360](https://productdesignonline.com/default-settings-for-fusion-360-tutorials/) - [site text](https://productdesignonline.com/tips-and-tricks/understanding-bodies-and-components-fusion-360-rule-1/)
- [How to Manually Add Sketch Constraints - Learn Autodesk Fusion 360 in 30 Days: Day #16](https://youtu.be/BGwBZJ14KHQ)
- [How to Create text in Fusion 360](https://youtu.be/BkpAtMAHtyQ)
- [How and Why to Fully Constrain Your Sketches](https://youtu.be/C11L136U0vQ)
### Other Tutorials
Autodesk (the makers of Fusion 360 have some very good tutorials to start of with):
- [Introduction to Fusion 360](https://help.autodesk.com/view/fusion360/ENU/courses/AP-GET-STARTED-OVERVIEW)
- [User Interface Overview](https://help.autodesk.com/view/fusion360/ENU/courses/AP-USER-INTERFACE-OVERVIEW)
- [Open, close, export, upload, and save designs](https://help.autodesk.com/view/fusion360/ENU/courses/AP-OPEN-CLOSE-EXPORT-UPLOAD-SAVE)
- [Set Preferences](https://help.autodesk.com/view/fusion360/ENU/courses/AP-OPEN-CLOSE-EXPORT-UPLOAD-SAVE)
- [Adjust Display settings](https://help.autodesk.com/view/fusion360/ENU/courses/AP-ADJUST-DISPLAY-SETTINGS)
- [Use the Marking Menu](https://help.autodesk.com/view/fusion360/ENU/courses/AP-MARKING-MENU)
- [Use the Toolbox](https://help.autodesk.com/view/fusion360/ENU/courses/AP-TOOLBOX)
- [Create A Project](https://help.autodesk.com/view/fusion360/ENU/courses/AP-CREATE-PROJECT)
- [Open a Design created in another CAD system](https://help.autodesk.com/view/fusion360/ENU/courses/AP-IMPORT-EXPORT)
- [Components and Bodies](https://help.autodesk.com/view/fusion360/ENU/courses/AP-BODIES-COMPONENTS)
- [Parametric vs. direct modeling](https://help.autodesk.com/view/fusion360/ENU/courses/AP-CAPTURE-HISTORY)
- [Working with Design versions](https://help.autodesk.com/view/fusion360/ENU/courses/AP-FILE-VERSION)
For more advanced drawing and drawing tools, watch
- Autodesk Fusion 360 [Fusion 360: Sketch Constraints](https://youtu.be/J_2If5zVp84)
### Advanced Practice Examples
Here are two good practice designs (if you think you are ready for more advanced work)
- Product Design Online Day #1 [How to make a Lego Brick](https://youtu.be/6yPKMSb6ja8)
- Product Design Online #15 [How to 3D Model a Painter's Tripod](https://youtu.be/36uU1Z7OiJg1)
## 3D Models
We will cover 3D models in detail in the following lesson, however as a preview, there are only 3 methods in which we can use to create a digitized 3D model of an object using CAD. They are
1. by Extrusion<br>
creating a 2D outline in one plane and then extruding or extending the outline of the object in the axis perpendicular to that plane.
2. by Revolution<br>
creating a 2D outline in one plane/shape and then revolving the outline/shape a number of degrees in the perpendicular plane. This method is ideal for creating cylindrical objects.
3. by Sculpting<br>
this method is akin to playing with plasticine. We start with a defined object e.g. block, cylinder, sphere and then by pushing and pulling surfaces we are able to create a 3D model of the object.
## Assignment: Creating Models
In this assignment, you will use the skills learnt in Fusion360 to create 2 objects (Ex1 and Ex2). The assignments are an introduction to Fusion 360 and will not take longer than 30 minutes. At the end of each exercise, you will have an oppurtunity to enhance your drawing by applying some modelling techniques to make the objects more life-like.
### Ex 1
Instructions:
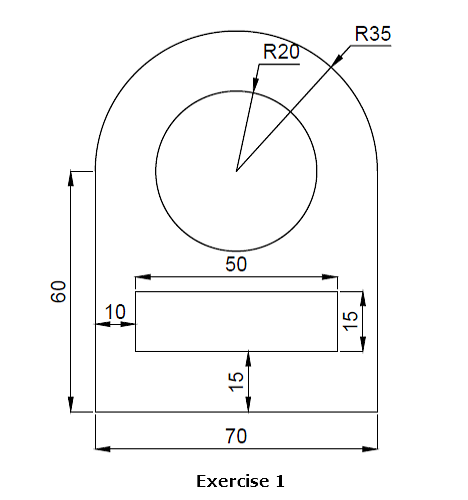
This is a simple design to get you started.
1. In Fusion 360, create a new project, save the project name as `cad_ex1`. (This is a good habit, so that you do not lose your creations!)
2. Create a new component - `widget`.<br>
Again, a good habit, as components (parts) can be exchanged between projects and is encapsulated (contained-within).
3. Select the component, and create a sketch.<br> By creating a sketch you are creating a viewpoint from a particular angle (usually from the side, top or bottom) which makes it easier to draw a profile.<br>
Select the X-Z plane (with the Z-axis going upwards)
4. Draw the profile below.<br>
When you have finished, the sketch should be **fully constrained** i.e. shaded a light-blue. This shows that the object is closed and does not have any leaks/holes.<br>
5. Exit out of the sketch.
6. Select Modify>Extrude and select the profile.<br>
Extrude the object 5mm upwards. You should have the solid widget as shown below.
### Ex 2
Instructions:
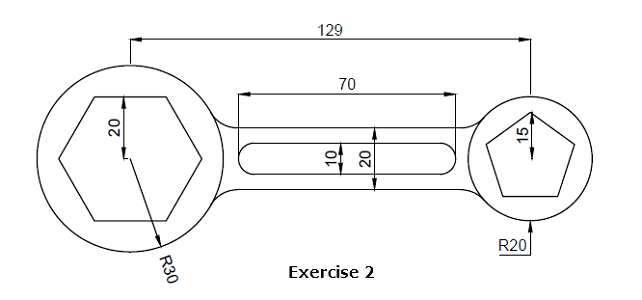
1. Examine the drawing above and create in your mind the necessary workflow to develop this model.<br>Try to follow the same steps as in Ex 1.
2. Draw the 2D-profile in Fusion 360.
3. When you have finished, try the following modifications:
- extrude the profile by 15mm to get a soldi model.
- how can I create a more life-like spanner/wrench by making the "heads" (round parts) larger than the shank?<br>
Similarly, make the middle part of the shank a little thinner for better grip.
- round-off (fillet) all sharp edges using a radius of 0.5 mm.<br>What happens if you make the radius larger?
You can watch a simple worked example [here](https://youtu.be/A9DpjtKvEVo).
<!-- Home, Back using Javascript -->
<div style="height:2em"></div>
<div>
<form>
<input type="button" value="Home" onclick="window.location.href='/ep1000digfab/index.html'">
<input type="button" value="Back" onclick="history.back()">
</form>
</div>
<!--End of markdown area-->